
Below you can find instructions on how to access TeamViewer via Mac OSX so we can access your computer.
Step 1: You can download TeamViewer via the link below.
https://teamviewer.com/en-au/download/macos/

click on “Download”
Step 2: Click the download icon or go to your downloads folder to run the file.
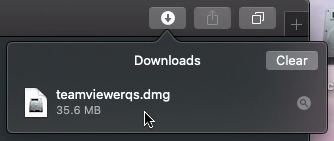
or look in the “Downloads” folder by following these steps
Finder > Go > Downloads

and double clicking on the filed called “TeamViewerQS.dmg”

Step 3: You will now see the following screen. Double click on TeamViewer QuickSupport.

Step 4: You may receive the following message. Click Open.

Step 5: You will now be asked to grant access to certain parts of your computer.


Step 6: click on “Setup Screen Recording”
in Settings goto “Privacy & Security” > “Screen & System Audio Recording”

Click the toggle next to “Teamviewer QuickSupport”

Now click “Quit & Reopen”

Step 7: Now click on “Setup Accessibility”
in Settings goto “Privacy & Security” > “Accessibility”

Click the toggle next to “Teamviewer QuickSupport”

Step 8: With both boxes ticked … click “Continue”
The following should appear

Wait a few seconds …. and once there is a Green button showing “Ready to Connect”, all is now ready to start a Teamviewer Session
Step 8: Give the person trying to help you the Teamviewer ID and Password and they will be able to connect to your Mac
The next time you wish to have someone help you, locate the file
“TeamViewerQS.dmg” and double click it, this will start the session and create a new password. Again give the Teamviewer ID and password to the person who is trying to help you. You may wish to re;ocate the “TeamViewerQS.dmg” file to your Desktop so it is easier to find in the future.