We show you how to repurpose an old iMac as a media server so you can download films and TV shows from Torrents and play them on your Smart TV.
There are many purpose built NAS or Mini-PC’s you can purchase to achieve the same thing but our example is to repurpose an old iMac and replace its MacOS with a Linux based OS, Ubuntu 22.04 (free)
Steps to follow
- Creating a Ubuntu Boot Disk
- Installing Ubuntu on an iMac, Mac Mini or MacBook
- Setting up Ubuntu to share files with your TV
- Setting up Ubuntu so it can be remote controlled from another Mac or Windows computer
- Installing Caffeine to ensure the Ubuntu server is always awake and available
- Installing a bit torrent client on Ubuntu
- Finding and downloading torrent files
- Locating and playing files on your TV
Step 1 – Creating a Ubuntu Boot Disk

With a bootable Ubuntu USB stick, you can:
- Install or upgrade Ubuntu
- Test out the Ubuntu desktop experience without touching your PC configuration
- Boot into Ubuntu on a borrowed machine or from an internet cafe
- Use tools installed by default on the USB stick to repair or fix a broken configuration
Follow these tutorials to help you create a bootable USB stick from both Microsoft Windows or Apple macOS.
Step 2 – Installing Ubuntu on an iMac, Mac Mini or MacBook

If there is any data you want keep from the old mac, back it up now to Timemachine or an external drive. Once we install Ubuntu, you may lose all the data on the Mac.
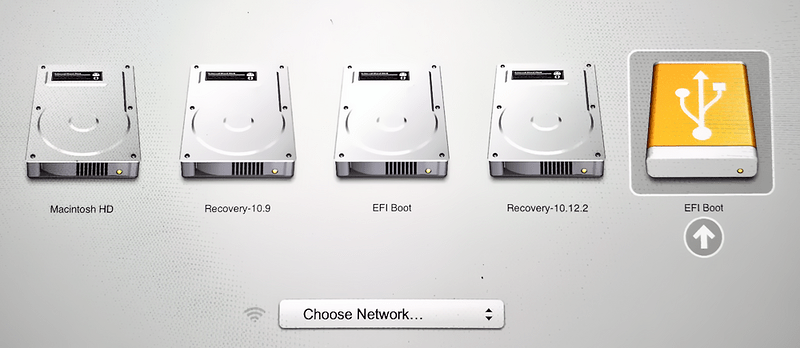
Insert the USB stick into an Apple Mac, you will need to restart or power-on the Mac with the USB stick inserted while the Option/alt (⌥) key is pressed.
This will launch Apple’s ‘Startup Manager’ which shows bootable devices connected to the machine. Your USB stick should appear as gold/yellow and labelled ‘EFI Boot’. Selecting this will lead you to the standard Ubuntu boot menu.
Now simply follow the prompts to install Ubuntu on your Mac.
Step 3 – Setting up Ubuntu to share files with your TV
With Ubuntu installed on the iMac (or whatever device you are using) goto Settings > Sharing
Click on Media Sharing and switch it on
You can choose what data you wish to share

Any data files in the selected shared folder should now be visible on any other device such as a smart-TV or iPad running VNC
Step 4 – Setting up Ubuntu so it can be remote controlled from another Mac or Windows computer
You can use Microsoft Remote Desktop (RDP) to connect to the Ubuntu server from Windows or Mac by installing Microsoft Remote Desktop from the App Store.
Set up your Ubuntu this way by opening Terminal, and typing

sudo apt-get update
After that install XRDP:
sudo apt-get install xrdp
Enable XRDP to start on boot:
sudo systemctl enable xrdp
If you have a firewall make sure that the 3389 port is open:
sudo ufw allow 3389/tcp
Now connect to your Linux machine using Microsoft Remote Desktop (RDP) for Windows or Mac, using the password displayed in Settings > Sharing > Remote Desktop

Logging in can be troublesome. Make sure the password you use on your Ubuntiu system is complex enough. You may find that you need to Log Out of Ubuntu and leave it at the login screen before attempting to connect using RDP
Step 5 – Installing Caffeine to ensure the Ubuntu server is always awake and available
Ubuntu servers have a tendency to slumber into power saving mode no matter how you setup the power settings

The only way of preventing this and making sure the files on the server are available 24/7 is to install a utility program called Caffeine, In Terminal type this
sudo apt install caffeineOnce installed
Goto “Applications” find the new program and run it. You can also drag the Caffeine indicator program to the status bar which will show you if the program is on or off

Step 6 – Installing a bit torrent client on Ubuntu
We are going to install a program called Qbittorrent to download torrent files such as Films, TV shows using your favourite Torrent Search engine such as The Pirate Bay
sudo apt install qbittorrent
Go to your system’s application launcher and there search for this Torrent client Linux application, as its icon appears, click to search the same.


Step 7 – Finding and downloading torrent files
Choose your favourite torrent search engine in a browser


click on one of the “Magnet” symbols and if prompted for a program to open the torrent, choose Qbittorrent
Step 8 – Locating and playing media files on a smart TV
On you Smart TV (this example is a Toshiba), navigate to “Source”, this should display a list of Networked devices on your network. You should be able to access file on those networked devices

If your TV is detecting the media files from the Ubuntu server, there should appear a symbol such as highlighted below:This symbol indicates a Universal Plug n Play (UPnP) data source
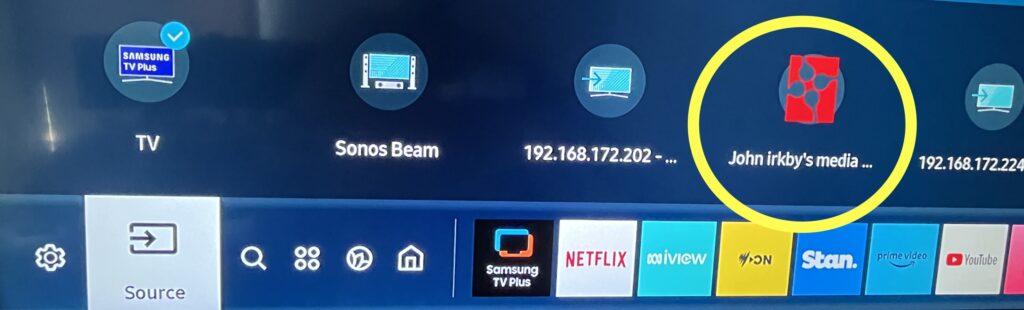
If you dont see the symbol, switch your TV off at the power point (do not use your remote to turn the TV off), restart the TV and repeat the process.
Once you see the symbol, use your remote to open the files structure and navigate to the folder your files are stored in and play them.
We hoped this solved one or two problems for you. Fortuately this worked today (Feb 2024) but as updates and new versions show up, things may change. Please let us know in the comments below if you have any comments or queries that we or other readers maybe able to help with.
Options
Sonos – Sharing Music Files on Linux Server